Adam's "Blog"

That's all, really.

Making Git Nice to Use

I’ve made a number of tweaks to my Git setup, but they never seemed that significant until I tried to work on a machine without them.

Probably the most important is to use a good command prompt. I use ConEmu, a tabbed Windows console app with many cool features.

  • I use its “Quake style slide down” along with a global hotkey to have a command prompt always quickly available.
  • If you create a ConEmu task (“tasks” are predefined apps/shells which you can launch in a new tab) which runs cmd.exe /k "%ConEmuBaseDir%\CmdInit.cmd" -git, you’ll see the current branch and status in every command prompt. It can slow things down slightly, since it’s running a git command every time you hit enter, but it’s worth it.
1
2
C:\Source\github\shrimpit [master +0 ~3 -0]
>
  • You can also make a copy of CmdInit.cmd to customize it; I wanted the > in the command prompt on a new line, so I made a customized version.

Clink provides command-line editing and tab completion in your command prompt (whether it’s cmd.exe or ConEmu). I forked and customized sweiss3’s code to create my own autocompletion script, so I can tab-complete branch names.

A GUI is often helpful too. I like TortoiseGit (along with P4Merge for resolving conflicts), so I created a batch file to quickly launch TortoiseGit commands. (I then realized that “tgit” is too much to type, and used ConEmu’s doskey aliases— under Startup, Environment in Settings— to define a shorter one: alias tg=c:\tools\tgit.cmd $*)

Speaking of aliases, I use a few in my Git config as well. You can put just about any Git command or shell command into an alias. To make git pr equivalent to git pull --rebase, for example, you would run:

1
git config --global alias.pr "pull --rebase"

And to make git hi run a shell command to say hi to you, by using !:

1
git config --global alias.hi "!echo Hi there"

(Leave out the --global if you only want it in the current repository.)

The aliases I use the most are just abbreviations: co for checkout, and ci for commit. I also use prom for pull --rebase origin master, to rebase a new branch on master in order to get it up to date before pushing it for the first time. And when I am ready to push it for the first time, I use pushup to set the upstream branch as shown below.

Here’s the full alias section from my .gitconfig. You can run git config --global --edit and paste in parts that you like.

1
2
3
4
5
6
7
8
9
10
11
12
13
14
15
16
17
18
19
20
21
22
23
24
25
26
27
28
[alias]
  # pull down the latest changes to the current branch, rebasing your changes after them
  pr = pull --rebase

  # show a pretty log with a graph of changes
  gl = log --graph --pretty=format:\"%Cred%h%Creset . %an: %s %Cgreen(%cr)%Creset\" --abbrev-commit --date=relative

  co = checkout
  ci = commit

  # pull the latest changes from master on the "origin" remote, and rebase your branch on it
  prom = pull --rebase origin master

  # when a rebase has stopped so you can resolve conflicts:
  rc = rebase --continue
  ra = rebase --abort

  # show a list of branches sorted by last commit, with details including hash and upstream
  br = branch -vv --sort=-committerdate

  # push a branch for the first time, setting its upstream to the same name as the branch (so you don't have to type --set-upstream and the name)
  pushup = ![[ $(git config "branch.$(git symbolic-ref --short HEAD).merge") = '' ]] && git push -u origin $(git symbolic-ref --short HEAD) || echo Upstream already set.

  # add all current changes (except new untracked files) to the previous commit, without prompting to edit the commit message
  amend = commit -a --amend --no-edit

  # push the current changes without running pre-push hooks, overwriting known commits on the server -- only for work-in-progress branches!
  pushwip = push --no-verify --force-with-lease

Now I can git co mybranc[TAB][ENTER], make my changes, and tg ci to review in TortoiseGit and commit.

Switching the microSD Card Between SoC and USB on a Zsun Wifi Card Reader Running OpenWRT

When I wrote my previous post about installing OpenWRT on the Zsun Wifi card reader, I didn’t know how to switch the SD card from being controlled by OpenWRT to being connected directly to the USB port for use by a different device. The Hackerspace page said:

The device contains a WAS7227Q USB switch, which connects the sd card reader chip to either the USB plug, or the AR9331 SoC. The switch is controlled with GPIO21. Set pin to LOW to connect card reader to SoC.

I thought GPIOs were pins you’d have to connect to in order to change this. But from this PirateBox post I learned that they can easily be changed from software under Linux:

echo 1 /sys/devices/virtual/gpio/gpio21/value

toggles the sdcard for use as a thumbdrive in a computer to transfer files
0=attached to zsun
1=attached as usb drive

And it’s just that easy. Setting it to 1 makes it disappear from the list of available USB devices:

root@MicroWrt:~# lsusb
Bus 001 Device 002: ID 05e3:0723 Genesys Logic, Inc. GL827L SD/MMC/MS Flash Card Reader
Bus 001 Device 001: ID 1d6b:0002 Linux Foundation 2.0 root hub
root@MicroWrt:~# echo 1 > /sys/devices/virtual/gpio/gpio21/value
root@MicroWrt:~# lsusb
Bus 001 Device 001: ID 1d6b:0002 Linux Foundation 2.0 root hub
root@MicroWrt:~#

And logs a message about its removal:

Fri Apr 15 16:34:54 2016 kern.info kernel: [  297.010000] usb 1-1: USB disconnect, device number 2

And setting it to 0 again brings it back:

Fri Apr 15 16:37:45 2016 kern.info kernel: [  467.980000] usb 1-1: new high-speed USB device number 3 using ehci-platform
Fri Apr 15 16:37:45 2016 kern.info kernel: [  468.130000] usb-storage 1-1:1.0: USB Mass Storage device detected
Fri Apr 15 16:37:45 2016 kern.info kernel: [  468.150000] scsi host1: usb-storage 1-1:1.0
Fri Apr 15 16:37:46 2016 kern.notice kernel: [  469.150000] scsi 1:0:0:0: Direct-Access     Generic  STORAGE DEVICE   9454 PQ: 0 ANSI: 0
Fri Apr 15 16:37:46 2016 kern.notice kernel: [  469.210000] sd 1:0:0:0: [sda] 121856 512-byte logical blocks: (62.3 MB/59.5 MiB)
Fri Apr 15 16:37:46 2016 kern.notice kernel: [  469.220000] sd 1:0:0:0: [sda] Write Protect is off
Fri Apr 15 16:37:46 2016 kern.debug kernel: [  469.220000] sd 1:0:0:0: [sda] Mode Sense: 03 00 00 00
Fri Apr 15 16:37:46 2016 kern.err kernel: [  469.230000] sd 1:0:0:0: [sda] No Caching mode page found
Fri Apr 15 16:37:46 2016 kern.err kernel: [  469.230000] sd 1:0:0:0: [sda] Assuming drive cache: write through
Fri Apr 15 16:37:46 2016 kern.info kernel: [  469.240000]  sda: sda1
Fri Apr 15 16:37:46 2016 kern.notice kernel: [  469.250000] sd 1:0:0:0: [sda] Attached SCSI removable disk

So it can be mounted under OpenWRT again:

root@MicroWrt:~# mount /dev/sda1 /mnt
root@MicroWrt:~# ls /mnt
Test from Windows.txt   Test.txt                test from microwrt.txt
root@MicroWrt:~# cat /mnt/Test\ from\ Windows.txt
All I had to do was: echo 1 > /sys/devices/virtual/gpio/gpio21/value
And bam, it's a drive.
Nice!root@MicroWrt:~# umount /mnt
root@MicroWrt:~#

Installing OpenWRT on the Zsun Wifi Card Reader (From Windows)

When I saw an article on Slashdot the other day about a small, cheap OpenWRT device, I had to give it a try. The zsun Wifi Card Reader is roughly an inch square and a half-inch thick. It has a MicroSD card slot and a USB plug. If you’re into hardware hacking, you can even solder on an Ethernet jack and make it more useful. But I was content to keep it simple and non-useful.

Everything you need to know about hacking it is on this Warsaw Hackerspace page.

I followed the easy-but-risky method listed there. I plugged the reader in to a USB port, then connected to its wifi network. I got the address 10.168.168.100, and the reader was 10.168.168.1.

I didn’t have a tftp server handy, so I downloaded one from Solarwinds. I downloaded the kernel and rootfs files from the Hackerspace page, and put them in the tftp server’s directory.

I then telnetted into the card reader by running putty.exe -raw 10.168.168.1 -P 11880, and ran the commands from the Hackerspace page:

# cd /tmp
# tftp -g 10.168.168.100 -r openwrt-ar71xx-generic-zsun-sdreader-kernel.bin
# tftp -g 10.168.168.100 -r openwrt-ar71xx-generic-zsun-sdreader-rootfs-squashfs.bin
# mtd_write write openwrt-ar71xx-generic-zsun-sdreader-kernel.bin /dev/mtd3
# mtd_write write openwrt-ar71xx-generic-zsun-sdreader-rootfs-squashfs.bin /dev/mtd2

The first tftp command timed out. Good old Windows Firewall was blocking the tftp attempt. I fired up Windows Firewall with Advanced Security, went to Inbound Rules, and added a new rule to allow connections to UDP port 67 from all networks. I retried the tftp, and it succeeded.

The mtd_write commands finished with “Bus error” as expected. I power-cycled and waited, and at last an “OpenWRT” wireless network appeared. I connected up and telnetted in (you have to telnet in the first time; when you run passwd to set your password, it enables ssh) to look around.

I edited /etc/config/network to change the network from 192.168.1.* to a less common one; edited /etc/config/system to change the hostname; edited /etc/config/wireless to change the SSID. I created /etc/dropbear/authorized_keys to make ssh'ing in easier.

Next, I followed instructions from the OpenWRT wiki to make the wifi operate in AP and STA mode (that is, as an access point for its own wireless network, plus a client on my existing wireless network). I also added a couple rules to /etc/config/firewall so that I could hit ssh and the web interface on its client IP address:

config rule
        option src wan
        option dest_port 22
        option target ACCEPT
        option proto tcp

config rule
        option src wan
        option dest_port 443
        option target ACCEPT
        option proto tcp

And now (after a reboot) it was online, so I could opkg update and install some packages. Fun!

I also tried mounting an SD card. I ran block info to list the block devices, and ran mount /dev/sda1 /mnt to mount the SD card in /mnt.

I still don’t know if it’s good for anything, but I’m always up for an easy OpenWRT install on an exciting new platform.

Generating an Https Certificate for an IIS Web Site Using Letsencrypt-win-simple

Let’s Encrypt, a service to provide free https certificates, recently entered public beta. I ran it on a Linux box and manually generated a certificate for an IIS server, using the following command:

./letsencrypt-auto certonly --manual -d example.com -d domain2.example.com -d domain3.example.com

That worked well, to generate a certificate for example.com with Subject Alternate Names domain2.example.com and domain3.example.com. It was a manual process, however, requiring me to create temporary files on each of those domains (and deal with some IIS configuration to serve them properly). For web servers which are directly supported by letsencrypt, this would be an automatic process.

While checking to see if IIS support might be forthcoming, I found the ACMESharp project (formerly named letsencrypt-win), and from there, the letsencrypt-win-simple project.

I cloned and built the letsencrypt-win-simple project, ran letsencrypt.exe with no parameters, and got the following output (well, without all the X’s):

Let's Encrypt (Simple Windows ACME Client)

ACME Server: https://acme-v01.api.letsencrypt.org/
Config Folder: C:\Users\adam\AppData\Roaming\letsencrypt-win-simple\httpsacme-v01.api.letsencrypt.org

Getting AcmeServerDirectory
Enter an email address (not public, used for renewal fail notices): XXXXXXX@XXXXXXX.XXX
Calling Register
Do you agree to https://letsencrypt.org/documents/LE-SA-v1.0.1-July-27-2015.pdf? (Y/N)
Updating Registration
Saving Registration
Saving Signer

Scanning IIS 7 Site Bindings for Hosts
 1: IIS devXXXXXX (%SystemDrive%\inetpub\wwwroot)
 2: IIS deXXXXXXX (C:\Source\XXXXXXX\XXXXXXXXXXXX)
 3: IIS umbraco4 (c:\Source\XXXXXXXX\umbraco)
 4: IIS local.XXXXXXXXX (C:\Source\XXXXXX)
 5: IIS cXXXXXXXXXXXXX (C:\Source\XXXXXXXXXXXXXXX\XXXXXXXXXXX)
 6: IIS dXXXXXXXXXXXX (C:\Source\XXXXXXXXXXXX\XXXXXXXXXXXXXXXX\XXXXXXXX)
 7: IIS local.XXXXXXXXX (c:\Source\XXXXXXXXX)
 8: IIS test.XXXXXXXXX (c:\Source\XXXXXXXXX)
 9: IIS local.XXXXXX.XXXXXXXXXX (c:\Source\XXXXXXXXX\XXXXXXXXXXX\XXXXXXX)
 10: IIS cXXXXXXX (C:\Source\XXXXXXXXXX\XXXXXXXXXXXX)
 11: IIS devXXXXXXXXXXX (C:\Source\XXXXXXXXXXXX\XXXXXXXXX\XXXXX)
 12: IIS pXXXXXXXXXXXX (C:\Source\XXXXXXXXXXX\XXXXXXXXX\XXX)
 13: IIS www.XXXXXXXXXX (C:\Source\XXXXXXXXXXXX\XXXXXXXXXXX)
 14: IIS cXXXXXXX (c:\inetpub\wwwroot)

 M: Generate a certificate manually.
 A: Get certificates for all hosts
 Q: Quit
Which host do you want to get a certificate for: q

As you can see, I have a lot of sites in IIS, but the test site I wanted the certificate for was not shown. This is because it had no host headers — it was bound to a port on all unassigned IPs, without a host header. I added another binding, with a host header, to that site, then ran letsencrypt.exe again, and it showed my site in the list. I entered its number at the prompt and continued. (I’m not sure how you would create a certificate with Subject Alternate Names, like I did with letsencrypt above, or if that is even supported in letsencrypt.exe.)

Which host do you want to get a certificate for: 10

Authorizing Identifier XXXXX.XXXXX.XXX Using Challenge Type http-01
 Writing challenge answer to C:\inetpub\XXXXXX\.well-known/acme-challenge/eue_UrCJxw9Xpu3F7QxxIoXPq77GwaEuXSzj4RTj6so
 Writing web.config to add extensionless mime type to C:\inetpub\XXXXXX\.well-known\acme-challenge\web.config
 Answer should now be browsable at http://XXXXX.XXXXX.XXX/.well-known/acme-challenge/eue_UrCJxw9Xpu3F7QxxIoXPq77GwaEuXSzj4RTj6so
 Submitting answer
 Refreshing authorization
 Refreshing authorization
 Authorization Result: invalid

******************************************************************************
The ACME server was probably unable to reach http://XXXXX.XXXXX.XXX/.well-known/acme-challenge/eue_UrCJxw9Xpu3F7QxxIoXPq77GwaEuXSzj4RTj6so

Check in a browser to see if the answer file is being served correctly.


This could be caused by IIS not being setup to handle extensionless static
files. Here's how to fix that:
1. In IIS manager goto Site/Server->Handler Mappings->View Ordered List
2. Move the StaticFile mapping above the ExtensionlessUrlHandler mappings.
(like this http://i.stack.imgur.com/nkvrL.png)

******************************************************************************
Press enter to continue.

It told me what to do, but instead of doing that, I created a web.config in the .well-known directory as described here. (I removed the , as it duplicated the section in the web.config which letsencrypt.exe created in the acme-challenge directory, causing an error.)

And it worked:

 Authorization Result: valid
 Deleting answer

Requesting Certificate
 Request Status: Created
 Saving Certificate to C:\Users\adam\AppData\Roaming\letsencrypt-win-simple\httpsacme-v01.api.letsencrypt.org\XXXXX.XXXXX.XXX-crt.der
 Saving Issuer Certificate to C:\Users\adam\AppData\Roaming\letsencrypt-win-simple\httpsacme-v01.api.letsencrypt.org\ca-100823E47413E5750B34E74D1E912E45DE-crt.pem
 Saving Certificate to C:\Users\adam\AppData\Roaming\letsencrypt-win-simple\httpsacme-v01.api.letsencrypt.org\XXXXX.XXXXX.XXX-all.pfx (with no password set)
 Opened Certificate Store "My"
 Adding Certificate to Store
 Closing Certificate Store
 Adding https Binding
 Committing binding changes to IIS
 Creating Task letsencrypt-win-simple httpsacme-v01.api.letsencrypt.org with Windows Task Scheduler at 9am every day.
 Renewal Scheduled IIS XXXXX.XXXXX.XXX (C:\inetpub\XXXXXX) Renew After 2/10/2016
Press enter to continue.

But hitting the web site failed. I looked in IIS Manager and found that the site was stopped. When I tried starting it, I got this error:

---------------------------
Internet Information Services (IIS) Manager
---------------------------
The process cannot access the file because it is being used by another process. (Exception from HRESULT: 0x80070020)
---------------------------
OK   
---------------------------

Something else was bound to the port.

C:\> netstat -nao | grep LISTENING | grep :443
TCP    0.0.0.0:443            0.0.0.0:0              LISTENING       2840

Process Explorer showed me that process ID 2840 belongs to Skype.exe. This Stack Overflow answer told me to go into Skype’s Tools, Options, Advanced, Connections, and uncheck “Use port 80 and 443 for additional incoming connections”. After clicking Save and restarting Skype as prompted, port 443 was freed up and I was able to start the web site.

Hitting it remotely still didn’t work, however. I tried hitting https://localhost/ to test it from my machine; it came up, but showed a 404 error because the hostname on that site binding was not “localhost”. But that was enough to tell me that IIS was listening on that port, and I realized it was probably Windows Firewall. I added an inbound rule allowing port 443, and at last my site was secured with https.

letsencrypt.exe also (as mentioned in its output above) created a Task Scheduler task to run every day and keep my certificates renewed. Pretty cool. I will find out if it works in three months.
Why Can't I Remove the X Close-tab Button From Chrome Tabs?

I have used a decent number of browsers over the years since I first fired up Mosaic, and I believe Chrome is my all-time favorite. I have liked its wacky tabbed interface, fast javascript, and separate tab processes (back when that was something special) since it first launched back in 2008. I have appreciated its easy extension API since I began using it a couple years back. It has been my primary browser ever since a javascript-whitelisting plugin was available for it.

But there is one thing wrong with it: I can’t remove the X button from the tabs.

I NEVER intentionally close a tab by clicking the X button. I generally press Ctrl-W, and if I want to use the mouse, middle-clicking the tab presents a much bigger target. The X button brings me only pain and suffering.

Yes, I can Ctrl-Shift-T to reopen a tab, but that doesn’t always bring back the current state of the tab (and it certainly doesn’t take away the annoyance of having closed it). Yes, I can pin tabs, but I’m not going to misuse that feature and wipe out the text labels on all my tabs just to make up for their bad design choice.

It will apparently never be fixed, as the Chromium bug report was closed WontFix years ago.

  • 2014-12-09: I accidentally closed a tab. Ctrl-Shift-T.
  • 2014-12-13: Same thing. Once again, easily remedied.
  • 2015-08-02: Again. (I had forgotten about logging it here for a long time, but it’s still just as annoying and stupid.)
  • 2016-01-22: Middle-clicked to open a new tab. Clicked to activate it. Closed it. Got annoyed.

Commit All Changes in a Solution Using NuGet PowerShell

When Visual Studio 2012 dropped support for macros, I lost a few of my favorite tools — for a while. John Robbins of Wintellect realized you could use PowerShell as a macro language and run your functions from the Package Manager (NuGet) Console. I ported over some macros at once, and have been happily using them ever since. (I still don’t know how to bind a hotkey to a “macro”… but I bound a key to the Package Manager Console, and created short aliases for my functions, so running them is not hard.)

One of my most-used functions is Tortoise-CommitSolution, to open the TortoiseSVN or TortoiseGit Commit dialog, and pass it all the paths in the solution. (This helps me to avoid the curse of the missed commit.) Below is the script I use for it.

First, check if you have the NuGet Package Manager installed. Open Visual Studio (2012 or 2013) and go to Tools, Library Package Manager, Package Manager Console. If this works, you’re all set.

But if there is no “Library Package Manager” submenu under the Tools menu, then you need to install it. Go to Tools, Extensions and Updates; click “Online”, and in the search box, type “nuget package manager”. The first hit should be “NuGet Package Manager”; go ahead and click Download and install it, and restart Visual Studio as prompted.

Now, to use Tortoise-CommitSolution, download the script and save it somewhere such as My Documents\WindowsPowerShell. Next, you’ll want to edit your profile to dot-source that script and to make a short alias for the function. To do this, type notepad $profile in the Package Manager Console. Add these two lines (adjusting the path in the first one to point at the place where you saved the script):

    . $Env:UserProfile\Documents\WindowsPowerShell\commit.ps1
    Set-Alias commit Tortoise-CommitSolution

Save your profile, and then run this in the Package Manager Console to reload it: . $profile

Now open a solution, and type commit in the Package Manager Console. Magic!

Here’s the script:

(commit.ps1) download
1
2
3
4
5
6
7
8
9
10
11
12
13
14
15
16
17
18
19
20
21
22
23
24
25
26
27
28
29
30
31
32
33
34
35
36
37
38
39
40
41
42
43
44
45
46
47
48
49
50
51
52
53
54
# Tortoise-CommitSolution by Adam Coyne <adam@coyne.nu>
# Add a convenient alias (like "Set-Alias commit Tortoise-CommitSolution") for this to your ${Env:HOME}\Documents\WindowsPowerShell\NuGet_profile.ps1
function Tortoise-CommitSolution {
    [string[]]$projectpaths = Get-Project -All | foreach { [System.IO.Path]::GetDirectoryName($_.FullName) }
    $projectpaths += $dte.Solution.FullName
    if($projectpaths.length -gt 0) {
        $filename = Write-PathFile(Filter-PathArray($projectpaths))
        # Visual Studio is 32-bit, but I have 64-bit TortoiseSvn and TortoiseGit installed
        $programfiles = $Env:ProgramW6432
        if(!$programfiles) { $programfiles = $Env:ProgramFiles }
        if(Get-LocalOrParentPath .svn $projectpaths[0]) {
            & "$programfiles\TortoiseSVN\bin\tortoiseproc.exe" /command:commit /deletepathfile /pathfile:`"$filename`" /hwnd:$($dte.MainWindow.HWnd)
        } elseif(Get-LocalOrParentPath .git $projectpaths[0]) {
            & "$programfiles\TortoiseGit\bin\tortoisegitproc.exe" /command:commit /deletepathfile /pathfile:`"$filename`" /hwnd:$($dte.MainWindow.HWnd)
        }
    }
}

# Filter out paths that are contained within another path, so modified files won't show up twice in the Commit dialog.
function Filter-PathArray([string[]]$paths) {
    [string[]]$filteredprojectpaths = @()
    [string]$lastCommonParentPath = "*" # an initial value that won't match

    foreach($p in $paths | Sort-Object) {
        if(-not $p.StartsWith($lastCommonParentPath)) {
            $filteredprojectpaths += $p
            $lastCommonParentPath = $p + "\"
        }
    }
    return $filteredprojectpaths
}

# Tortoise's pathfile contains paths delimited by line feeds and with a trailing line feed, and is formatted as Unicode with no BOM.
function Write-PathFile([string[]]$files) {
    $filename = [System.IO.Path]::GetTempFileName()
    $contents = [string]::join("`n", $files) + "`n"
    $bytes = [System.Text.Encoding]::Unicode.GetBytes($contents)
    Set-Content -Encoding byte $filename $bytes
    return $filename
}

# From https://github.com/dahlbyk/posh-git
function Get-LocalOrParentPath($path, $startPath = '.') {
    $checkIn = Get-Item $startPath
    while ($checkIn -ne $NULL) {
        $pathToTest = [System.IO.Path]::Combine($checkIn.fullname, $path)
        if (Test-Path $pathToTest) {
            return $pathToTest
        } else {
            $checkIn = $checkIn.parent
        }
    }
    return $null
}

TortoiseGit Shortcuts for Visual Studio

In my last post I went over the External Tools setup I use to launch TortoiseSVN from Visual Studio. Nearly all of those commands (all except Update) can be reused for TortoiseGit with a minor tweak. And better still, they can be launched from the same menu item. All we need is a little script to detect whether we are working in a git repository or an SVN working copy and launch TortoiseProc.exe or TortoiseGitProc.exe as appropriate.

(TortoiseWhicheverProc.cmd) download
1
2
3
4
5
6
7
8
9
10
11
12
13
14
15
16
17
18
19
20
21
22
23
24
25
26
27
28
29
30
31
32
33
34
35
36
37
@ECHO OFF
SET FOUND=
SET SEARCHPATH=%CD%
SET LASTSEARCHPATH=

ECHO %~nx0: finding source control dir for %SEARCHPATH%

:loop
CALL :checkdir "%SEARCHPATH%"
IF NOT "%FOUND%"=="" GOTO %FOUND%
SET LASTSEARCHPATH=%SEARCHPATH%
FOR %%i IN ("%SEARCHPATH%\..") DO SET SEARCHPATH=%%~fi
IF "%SEARCHPATH%"=="%LASTSEARCHPATH%" goto notfound
GOTO loop

:checkdir
ECHO Checking %~f1
IF EXIST "%~f1\.git\." SET FOUND=git
IF EXIST "%~f1\.svn\." SET FOUND=svn
GOTO :EOF

:svn
echo It's svn!
echo Running: tortoiseproc.exe %*
start tortoiseproc.exe %*
goto :EOF

:git
echo It's git!
echo Running: tortoisegitproc.exe %*
start tortoisegitproc.exe %*
goto :EOF

:notfound
echo Not found!
exit /b 1
goto :EOF

Just save that batch file somewhere in your search path, replace TortoiseProc.exe with TortoiseWhicheverProc.cmd in each of those commands (except the Update), and it will magically work for SVN and git. Check the “Use Output window” box to see the batch file’s output.

TortoiseSVN Shortcuts for Visual Studio

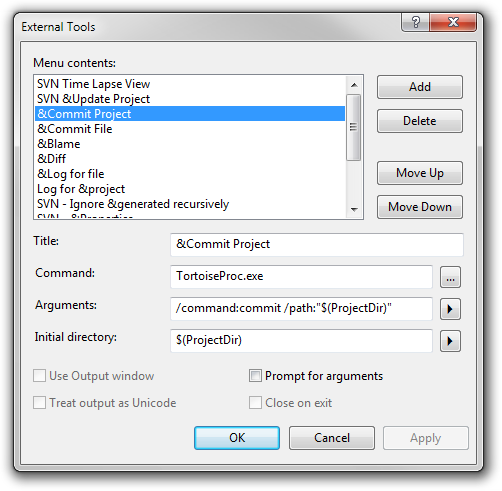
TortoiseSVN is a great SVN client, but it’s not integrated with Visual Studio. I use the External Tools feature to add in some of my commonly-used commands.

Here’s my “Commit Project” tool. With this set up, I can just press Alt-T, C to open the TortoiseSVN Commit dialog for the current project’s directory.

This assumes that TortoiseProc.exe is in your search path. (It’s located in C:\Program Files\TortoiseSVN\bin; if it’s not in your path, you can use the fully-qualified name.)

  • Title: &Commit Project (The ampersand before the C makes it the accelerator key in the menu.)
  • Command: TortoiseProc.exe
  • Arguments: /command:commit /path:"$(ProjectDir)"
  • Initial Directory: $(ProjectDir)

Here are some other useful ones:

  • Title: &Commit File
  • Command: TortoiseProc.exe
  • Arguments: /command:commit /path:"$(ItemPath)"
  • Initial Directory: $(ProjectDir)

  • Title: &Blame
  • Command: TortoiseProc.exe
  • Arguments: /command:blame /path:"$(ItemPath)" /startrev:1 /endrev:-1 /line:$(CurLine)
  • Initial Directory: $(ProjectDir)

  • Title: &Diff
  • Command: TortoiseProc.exe
  • Arguments: /command:diff /path:"$(ItemPath)"
  • Initial Directory: $(ProjectDir)

  • Title: &Log for File
  • Command: TortoiseProc.exe
  • Arguments: /command:log /path:"$(ItemPath)"
  • Initial Directory: $(ItemDir)

  • Title: Log for &Project
  • Command: TortoiseProc.exe
  • Arguments: /command:log /path:"$(ProjectDir)"
  • Initial Directory: $(ProjectDir)

  • Title: &Update Project
  • Command: TortoiseProc.exe
  • Arguments: /command:update /path:"$(ProjectDir)"
  • Initial Directory: $(ProjectDir)

(See also my post about using these shortcuts for TortoiseGit.)

Combining Commits With TortoiseGit

I forgot a small change in the initial git commit of a new project. I didn’t want to have an extra commit for a little fix like that, so I tried combining it.

I found a Stack Overflow post telling me what to do— in TortoiseGit Log, select the two commits, right-click and Combine.

These were the first two commits to a new repository, though, so it popped up a message: “The following commit dialog can only show changes of oldest commit if it has exactly one parent. This is not the case right now.” Indeed, the Commit dialog that popped up showed only the second revision’s change.

I edited the commit message (which consisted of both revisions' messages) and committed. And hooray, I then had only one commit.

Installing Openconnect on OpenWRT

openconnect is a client for Cisco’s AnyConnect SSL VPN. Here’s how to get it running on OpenWRT. (You can probably do most of the setup using the web interface, but I prefer the command line.)

OpenWRT version differences

On OpenWRT 10 (backfire), the openconnect package comes with only the executable, so you will need to create an init script to launch it and a vpnc script to set up routing and firewall rules; on OpenWRT 12 (attitude adjustment), it already includes a netifd script and basic vpnc-script.

OpenWRT 12 has a package for openconnect 3.18. OpenWRT 10.03.1 has openconnect 2.25. And OpenWRT 10.03 only has 2.01, which did not work for me; I edited the source packages URL in /etc/opkg.conf to use the 10.03.1 packages.

Installing the package

  • Get your list of available packages up to date: opkg update
  • Install the package: opkg install openconnect
  • Wait for it to download and install the package and its dependencies. Then take a look at the files that were installed for the package: opkg files openconnect
  • Check out the available parameters for openconnect: openconnect --help

Getting it configured

I had previously been running vpnc, so I already had a vpnc-script ready to go; I just had to make an init script. I copied pieces of an existing one:

#!/bin/sh /etc/rc.common

START=77
start() {
        echo "password" | /usr/bin/openconnect --user=Username --passwd-on-stdin --background --syslog --no-dtls --script=/etc/vpnc/vpnc-script --servercert=‎cde32ba30fb81ddc95ccce45b46ad61992ca0eeb https://vpn.example.com/

}

stop() {
        killall openconnect
}

restart() {
        trap '' TERM
        stop
        sleep 5
        start
}